Hello and welcome to another very special edition of Accumulated Knowledge. I was originally going to postpone this article another week, but the subject matter correlates pretty well to the recent outrage over the Community Cup (and I came up with a good title). If you haven’t read the first article in this series (although it didn’t start that way), you may want to go back and check it out. Also, if you aren’t familiar with the Zendikar Boom, or want a more detailed explanation of it, you can check out my first piece for MTGPrice. Both of the articles are free to read (and pretty good, in my opinion).
Skill Versus Card Availability
One of Mark Rosewater’s big recurring points about Magic is that it is not one game, but several, and they all happen to have the same rules. What he means when he says that is broader than just formats, it also has to do with skill—two novice players facing off are playing one kind of Magic, just as the finals of a Pro Tour can be a very different type of game entirely.
New players are often only thinking about their next turn, or at most what they themselves can do in the next few turns (likely that plan involves some giant green creature). At higher levels of play, the game becomes more focused on questions like: “What can my opponent do?” or “What is the critical turn in this matchup?” or “What spells or effects do I need to watch for and play around?” The same thing is true of sports: watch a football game in October on a Friday night, a Saturday night, and a Sunday night, and then tell me that you watched the same game being played—you see the same basic game rules, but totally different approaches and understanding.
Skill is the combination of talent and hard work, and in Magic, like everything else, skill is crucial to success. Players at higher skill levels are playing essentially different games, and the more skilled player is overwhelmingly favored to beat a less skilled opponent.
Unfortunately, Magic is not a game that you can play on skill alone. Card availability can, to varying degrees, hinder your ability to play and win at your preferred level of the game. The most innately talented Magic player on Earth will never make the Pro Tour if she shows up to every qualifying event with a “Learn to Play” preconstructed product, although there exists a (only slightly more probable) chance that a bad player with a very good deck can luck his way to a victory.
The Fetch Land Controversy
It is very possible to feel that you are being denied an opportunity to truly test and prove your skill if you do not have access to the full scope of Magic‘s arsenal. This, I believe, is the first reason why so many people were outraged over Mark Rosewater’s recent announcement that Battle for Zendikar would not feature the enemy-colored fetchlands: by not providing wider access to them, Wizards of the Coast is throttling the ability of many (mostly newer) players to compete at full efficiency.
BRIEF ASPIRATIONAL ASIDE: I want to quickly talk about the impact that the Pro Tour has on this way of thinking. The Pro Tour serves a few different purposes for Wizards of the Coast, but the primary one is advertising new product (hence the push to make all events Standard-only last year). One of the other main reasons, though, is to give players something to aspire to—a way to set your sights on something larger, something that would validate your desire to play Magic (and get you to attend tournaments). When the Pro Tour started, this made a lot of sense: Magic was popular, but no where near the level it is today. The Pro Tour was a means of growing Magic, as well as standardizing and legitimizing tournaments at large (much of early “Organized Play” was not very organized).
It is possible that Magic would have survived this long without the Pro Tour, but I sincerely believe that it would not be thriving. Aspiring to make the Pro Tour is a great goal, but it is a very difficult one. Currently, your best bet is to either spike a Grand Prix (which is difficult to do at any skill level), or straight up win one tournament and then make top four or top eight of another one (which may be several hours away!). The reason it is so difficult to do so is precisely because so many people have been trying to make the Pro Tour, and WOTC wants to make sure that attendance is below a certain threshold. Just as most players recognize the growth and development of their skills, so too should you reassess your aspirations.
I personally have changed my approach to tournament prioritization (favoring payout over thinking, “Will this get me to the Pro Tour eventually?”), and it has been a positive change in my approach to Magic. I still take the game seriously, I still play it often, but my personal aspirations are largely shorter term. We’ll get back to the article now, but I would consider other players to take the same introspective inventory of their own goals.
The enemy fetch lands are under-printed by current standards. The demand for them, however, is driven primarily by Modern and Legacy play (we are just going to roll Vintage into Legacy here, even though the two are wildly different).
Legacy has its supporters and detractors (I consider myself a supporter), but if you were to buy a deck in full today, it is likely going to cost you much more than a Standard deck, and there are many fewer opportunities to play with it competitively. Not owning a Legacy deck restricts Pro Tour aspirations only to the degree that there are three fewer Grands Prix that you can play in a given calendar year, and likely only one in the continent that you live in. The reason why I often suggest to people to ease into Legacy slowly is because so many of the tournaments are going to be at your local store, for very modest prizes. Don’t rush out and buy Esper Deathblade if you can only use it in a couple of SCG Opens a year, where you would need to win a few of them in order to break even.
Modern, whether you choose to accept it or not, is in a similar boat. Even though the format has a grassroots appeal, and has been wrongfully touted as a more budget-conscious alternative to eternal formats, it is still expensive to play with fewer opportunities to achieve at the highest levels (although we are guaranteed a PPTQ season and a PTQ for the time being). Modern’s biggest problem is that it is currently in what I call its “Wild West phase.” Modern, unlike its predecessor Extended, begins at a fixed point in time, Eighth Edition. The player base has more than doubled since the release of that set, and design philosophy has evolved significantly (especially with regards to core sets).
In practical terms, this means that there were enough Serum Visions printed for about six million players, even though there are anywhere from twelve to sixteen million currently active players (these numbers are raw, largely because Wizards stays tight-lipped on this type of information). The good news for Modern is that Wizards has stated that it will be reprinting aggressively to help alleviate that imbalance. However, it will happen on WOTC’s own internal time-table. The number-one job of Magic‘s design and development staff is to continue making new and exciting sets and experiences for players, not reprinting old sets (some of which didn’t sell very well anyways).
Things like Modern Masters, promotional cards, and supplemental products are great ways to get new copies of cards out to players, but the best way is through Standard-legal sets (which have much larger and longer printings compared to those other methods). In order for old cards to make it into Standard, though, they need to fit the current design (and more importantly development) philosophies of Magic, while also feeling like they contribute to the set as a whole and don’t waste valuable space (think Daybreak Coronet in MM2 Limited).
It’s possible that the enemy fetch lands would fit well into Battle for Zendikar‘s design, but it’s also possible that they would force development changes and throttle the other elements of the set (I don’t think we will see “Landfall: draw a card” if development knows that Misty Rainforest would be in Standard the entire time). I think that in five years, card availability specifically for Modern will be improved, and in ten years, it will be even better. Sadly, the long-term plan is not also the best short-term plan, but it is refreshing that Wizards is thinking more toward the former than the latter.
BRIEF MULTICOLOR ASIDE: Return to Ravnica having shock lands is more of a coincidence than a precedent. While that cycle has only appeared in Ravnican sets, the lands were named so as to be non-exclusive to any plane (Rosewater even said so when Temple Garden was first printed), and the truth is that that plane needs ten multicolor lands more than Zendikar needs fetchlands (Evolving Wilds at common would be just as frequent an enabler, not to mention the other areas of design space that landfall offers). Don’t assume that Overgrown Tomb and company will only ever be on Ravnica, and don’t assume that only Zendikar has Arid Mesas.
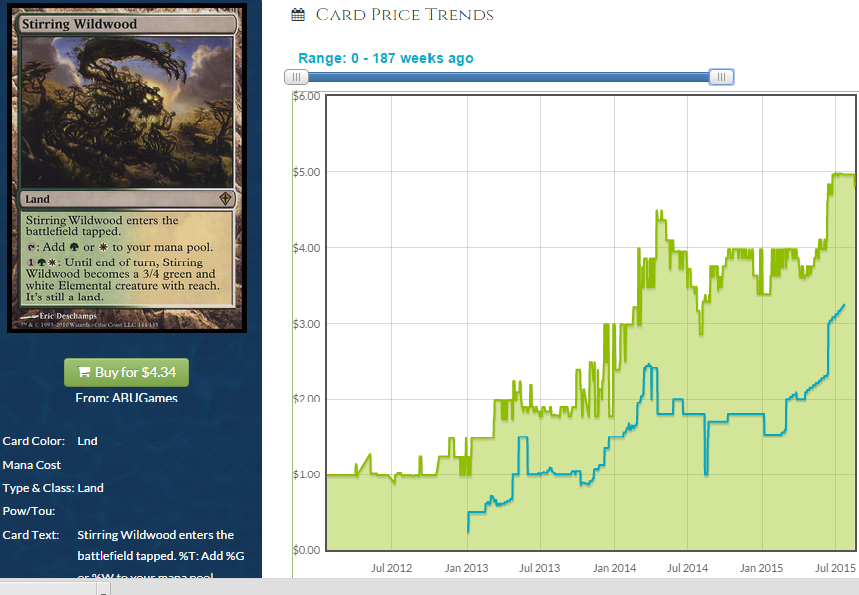
Because cards are not distributed by who is purest of heart and therefore most deserving of them, their means of determined value fall into the hands of the secondary market. In the case of Misty Rainforest and company, their value increased on the knowledge that the supply will not be increasing this fall, and very likely not any time in the immediate future. Card prices are determined by a multitude of factors (including the one I just mentioned), but blame too often falls on “speculators,” not the larger stores that have a much bigger overall impact.
In the instance of the enemy fetch lands, the amount of cards on the market dried up almost immediately in response to the announcement. Misty Rainforest went from $35 (I should know, I traded some away days earlier) to $85, even though buylist averages are at roughly $40. Star City Games has just over fifty English non-foil copies in stock (of various conditions) and a buylist price of only $35 for NM copies. The largest determining factor in a card’s value is what a store will pay for it, because that is your guaranteed, demonstrative floor. I suspect that enemy fetch lands will slowly drop in price as more are sold by players than are bought, and they will stabilize somewhere higher than they were before, but lower than they are now. It is unfortunate that this will restrict some players’ ability to compete (at least until a new printing happens), but Wizards excluded them in this instance for the better health of the set and the format, and sometimes that is going to happen (I’m sure they were tested at some point).
In Other News…
I’ve left a lot of this material open-ended because I want to leave enough spaces for (polite) conversation in the comments.
Before I wrap up, though, I want to talk very quickly about Hearthstone, especially in light of its recently announced monthly profits. Many Magic players are very vocally threatening to jump ship to the Blizzard product, but those statements are somewhat disingenuous. Just remember that you aren’t “investing” in Hearthstone as you might with Magic, because there is currently no means of a secondary market for the game (unless, I suppose, if you sell the account, as people have done with World of Warcraft). Also, as Hearthstone‘s audience grows, so will the difficulty of being above average at it, and with that the ability to “go pro” is diminished. It is a fun game, and I really enjoy it, but don’t assume that your purchases will appreciate the same way Magic ones often do.
Thanks for reading, and for my ProTrader regulars, look forward to that set review I’ve been promising next week.
Best,
Ross
